
Who Were
The Cambs
The Cambs
at War
1/1st Btn 1914-1919
1914 - 1/1st Overview
1915 - 1/1st Overview
1915 - St Eloi
1915 - Fosse Wood
1916 - 1/1st Overview
1916 - The Schwaben
1916 - St Pierre Divion
1917 - 1/1st Overview
1917 - St Julien
Insignia, Medals & Books
Remembering The Cambs
Biographies
About Us &
This Site
The Cambridgeshires and the Schwaben Redoubt - October 14th & 15th 1916
Part 5 – Strong Points & Riddell Trench
The fight to capture and hold the shattered remains of the Schwaben Redoubt had now reached a critical point. While the opening assault had been hugely successful the attackers were vulnerable. Sections of the Redoubt still remained in German hands and a counter attack could appear at any moment from any of three directions. The captured positions needed a great deal of work to make them defendable from an attack 180 degrees from what they were constructed to deal with. The gap between the Cambridgeshires and the bulk of the Black Watch still measured some 150 yards and included one of the key German defensive positions. As long as this position and section of trench remained in German hands the Redoubt would never be secure.
Riddell, having been the overall architect of the plan of attack, now was totally focused on the fight facing his battalion. Positioned along with his Battalion HQ Staff in an old German dugout, around 200 yards behind the assembly positions (now about 100 yards south east from the southern corner of Mill Road Cemetery), his main role now was to coordinate between his men in front and the Brigade Staff behind. Suitable locations for the vital battalion HQ had been seriously limited and Riddell knew he would be unable to avoid the attention of the enemy artillery. Soon after the attack started the enemy gunners started searching for the HQ, looking to knock out this key command point. The German artillerymen already knew the exact locations of the old dugouts that were now in British hands, so it was just a matter of keeping a steady stream of shells crashing down around them.
Further back from Riddell’s HQ, the Brigade Staff, under the watchful eye of the well-seasoned Brigadier, Edward Finch-Hatton DSO, were coordinating the attack on a wider level. It was their role to make sure that Riddell and Sceales (CO of the 4/5th Black Watch) had the artillery support and reinforcements they needed.
At this stage the fighting in the Cambridgeshries section of the Schwaben was focused on consolidating the position and pushing further out to take any of the key locations still resisting. German artillery fire was constantly raining down across the Redoubt and the men all knew a counter attack could appear at any moment. On the far left, the attacking Coy had initially pushed too far west down Strassburg Trench, and, despite taking numerous prisoners, they knew this advanced position was unsustainable. The men pulled back to a point nearer the Redoubt where they could establish a good defensive block.
In the centre the men had fought northwards through the network of smashed trenches and knew their orders; the details of Riddell’s plan having been drilled into all ranks. Numerous officers and SNCOs were already casualties so surviving NCOs instinctively took command of the men and pressed on, once again rising out of the relative safety of the trenches and into the shell-torn landscape beyond. It was their task to create Riddell’s new defensive line.
On the right of the Cambridgeshires sector the fighting became more intense and confused. Reinforced by some men from the Black Watch, who, unable to reach their objective had moved to their left and linked up with the right Coy of the Cambridgeshires, the men made repeated attempts to push east and close the gap between the two battalions. Numerous bombing attacks were made pushing towards the key position at point 99. With casualties mounting the German defenders were finally silenced and a party of Cambridgeshires reached and cleared out point 99. It became clear that the Black Watch were still fighting further to the east, or were pinned down in no-man’s-land and there were just not enough Cambridgeshires available to hold the position and the trenches around it. Having sent back the numerous prisoners and knowing the German garrison at point 99 was now either dead or had surrendered, the men pulled back and set up a fortified barricade halfway down the trench.
Riddell and the Battalion HQ were still under constant shellfire. The shells were frequently cutting the vital telephone lines that connected him to Brigade HQ, and, as was so often the case, communication with his men in front was now dependent on the brave runners. Relying on nothing but their speed, initiative and bravery, these young men, usually agile young volunteers with a talent for running, repeatedly made the perilous journey through the bursting shells to get the messages out. Alongside the gallant runners the battalion’s linesmen carried out their vital and heroic duty. Each time the telephone line was severed they crawled or ran through the enemy fire, either repairing the broken line or carrying a new one.
When the news reached Riddell that things were progressing well he decided to “reconnoitre the position” and moved up into the battered redoubt. As an old infantry officer Riddell’s thirst to do his part in the actual fighting soon found him leading a second push down Strassburg Trench. Remembering his responsibility and duties as CO he soon returned to his HQ and resumed his command.
At this stage the RFC observation plane flying over the battle spotted the still unoccupied stretch of trench to the right of the Cambs. The pilot also noted that many of the attacking Black Watch were still pinned down in no-man’s-land. The map containing these details was quickly dropped over Divisional HQ and the information was immediately passed to Brigade HQ, where Finch-Hatton ordered his reserves to move up through the Black Watch positions and close the gap.
While the fighting raged on both the Cambridgeshires’ left and right flanks the men in the centre were busy carrying out Riddell’s plan. The men pushed north from the Redoubt and started establishing the new defensive line among the honeycomb of shell holes. The original plan called for three strong points to be established at key locations in the ground beyond the Redoubt. Adapting these plans to fit the situation on the day the men began forming five strong points, as well as heavily fortifying two of the key positions in the captured redoubt. These two positions in the old Redoubt now housed the two Vickers machine guns of the 118th MGC that had advanced with the Cambs assault. They now formed the backbone of the defence with the line of strong points out in front. With every passing minute the British grip on the Redoubt was strengthening.
The men holding the strong points and shell holes worked tirelessly to improve their positions. Fighting and shelling was ongoing and casualties continued to mount. However, as Riddell had predicted, much of the German artillery fire crashed down on the Redoubt, leaving his network of strong points largely intact. As dusk fell and under the cover of the growing darkness, Riddell’s carefully thought out plan resulted in sappers from the Royal Engineers and pioneers of the Gloucesters arriving to assist with the construction of the defences. These men brought with them the barbed wire, wood and tools that were needed to help properly fortify the positions. Throughout the night the strong points and fortified shell holes were linked together by a shallow trench, this new improvised defensive line was quickly named “Riddell Trench”.
In the hours that had followed the Cambridgeshires' initial advance over no-man’s-land, Riddell’s men had faced their fiercest fighting of the War so far. From the dirty bayonet fighting to clear the trenches to the to-and-fro duels with bombs, there had been many individual acts of great bravery and sacrifice. As casualties mounted, many of the battalion’s officers were among those killed or wounded. Without hesitation NCOs of all ranks stepped up and led their platoon or company forward. Much of the success of the attack so far was down to the bravery and leadership shown by individuals of all ranks.
Back to the top of the page.
The Cambridgeshires & the Schwaben Redoubt
Part 1 - Background & History of the Redoubt
Part 2 - Riddell's Plan
Part 3 - Misfortune & Postponement
Part 4 - The Assault
Part 5 - Strong Points & Riddell Trench
Part 6 - Gallant Deeds
Part 7 - Counter-Attacks and Relief

Landmark & Position Locations (click for larger version).
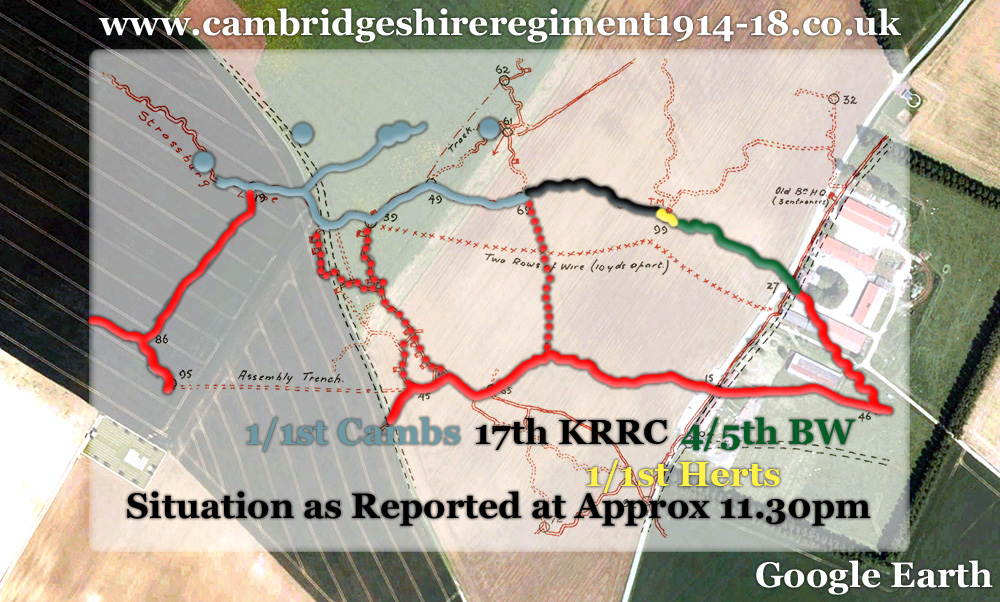
Situation at Approx 11:30pm (click for larger version).

This site went live on the 14th February 2015 to mark 100 years since the 1/1st Cambs went off to war.
WE WILL REMEMBER THEM
Email us: cambsregt@gmail.com
Copyright 2015, 2016, 2017, 2018, 2019 by Felix Jackson. The information and images on this site should not be reproduced without prior permission.